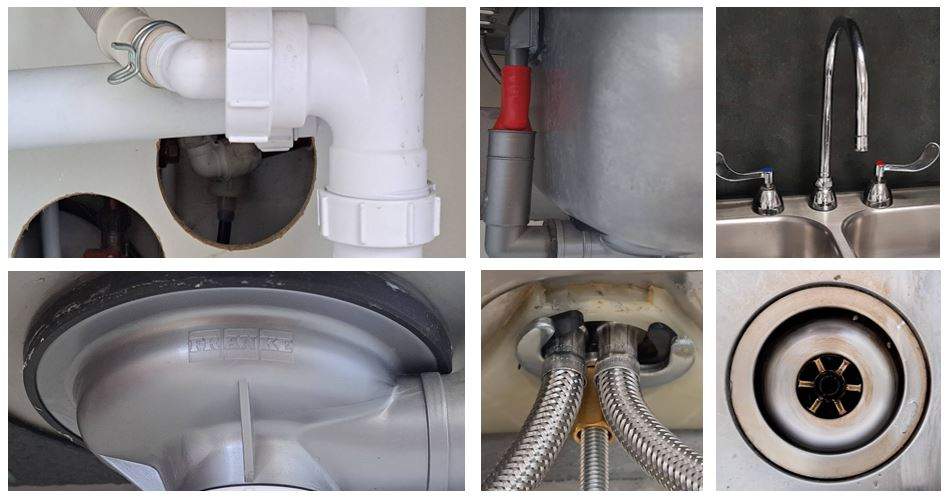
Sink Drain Replacement 101 Everything You Need to Know

Sink Drain Replacement 101 Everything You Need to Know

Sink Drain Replacement 101 Everything You Need to Know

Sink Drain Replacement: Mastering the Basics

Understanding the Importance of Proper Drainage

When it comes to maintaining a functional kitchen or bathroom, ensuring proper drainage is paramount. A sink’s drain plays a crucial role in this, facilitating the efficient removal of water and waste from the fixture. Over time, wear and tear can compromise the integrity of the drain, leading to issues such as clogs and leaks. Understanding the basics of sink drain replacement is essential for homeowners looking to address these concerns effectively.

Assessing the Situation: Identifying Signs of Trouble

Before embarking on a sink drain replacement project, it’s important to assess the condition of the existing fixture. Common signs of drain problems include slow drainage, foul odors emanating from the sink, and visible leaks or water damage. By identifying these indicators early on, homeowners can take proactive measures to address the issue before it escalates into a more significant problem.

Gathering the Necessary Tools and Materials

To successfully replace a sink drain, you’ll need the right tools and materials at your disposal. These typically include a pipe wrench, adjustable pliers, plumber’s putty, pipe tape, and a new drain assembly. It’s essential to ensure that you have everything you need before beginning the replacement process to avoid unnecessary delays or complications.

Preparation and Disassembly: Taking Things Apart

Once you’ve gathered your tools and materials, the next step is to prepare the area for drain replacement. This involves clearing out the space under the sink and shutting off the water supply to the fixture. With the water turned off, you can then begin the process of disassembling the old drain, starting with the P-trap and working your way up to the sink drain itself.

Installing the New Drain Assembly: A Step-by-Step Guide

With the old drain removed, it’s time to install the new drain assembly. Begin by applying plumber’s putty to the underside of the drain flange before inserting it into the sink’s drain opening. Next, thread the locknut onto the drain from beneath the sink, ensuring a secure fit. Once in place, connect the P-trap and other components of the drain assembly according to the manufacturer’s instructions.

Testing and Inspection: Ensuring Proper Functionality

After completing the installation process, it’s essential to test the new drain for leaks and proper functionality. Run water through the sink and check for any signs of leakage around the drain assembly. Additionally, ensure that water drains efficiently without any backups or slow drainage issues. Taking the time to thoroughly test and inspect the new drain will help identify any potential problems early on, allowing for timely resolution.

Troubleshooting Common Issues: Addressing Challenges

Despite your best efforts, you may encounter challenges during the sink drain replacement process. Common issues include difficulty removing corroded or rusted components, alignment problems with the new drain assembly, or unexpected leaks upon testing. In such cases, patience and persistence are key. Don’t hesitate to seek guidance from online resources, tutorials, or professional plumbers if needed to overcome these obstacles effectively.

Read More
Lowe’s Home Repair Where Quality Meets Affordability

Lowe’s Home Repair Where Quality Meets Affordability

Lowe’s Home Repair Where Quality Meets Affordability

Transform Your Space with Lowe’s Home Repair Solutions

When it comes to maintaining and enhancing your home, Lowe’s Home Repair Solutions stands out as your ultimate partner. With a dedication to quality, affordability, and expertise, Lowe’s offers a range of services to tackle any repair or improvement project you may have in mind.

Expert Guidance for Home Repairs at Lowe’s

At Lowe’s, we understand that home repairs can be daunting tasks. That’s why we provide expert guidance every step of the way. Our team of skilled professionals is ready to assist you in assessing your needs, recommending solutions, and executing repairs with precision and care. Whether you’re dealing with a leaky faucet, a faulty electrical system, or a worn-out roof, we’ve got you covered.

Elevate Your Living with Lowe’s Home Repair Services

Your home is more than just a place to live—it’s a reflection of your lifestyle and personality. With Lowe’s Home Repair Services, you can elevate your living space to new heights. From minor touch-ups to major renovations, our services are designed to enhance both the aesthetic appeal and functionality of your home. Say goodbye to outdated fixtures and hello to a space that truly inspires.

Hassle-Free Home Fixes with Lowe’s

Gone are the days of stressing over home repairs. With Lowe’s, you can enjoy hassle-free fixes that are efficient, reliable, and convenient. Our streamlined process ensures minimal disruption to your daily routine, allowing you to sit back and relax while we take care of the hard work. With us, your satisfaction is guaranteed every step of the way.

Revitalize Your Home with Lowe’s Repair Services

Is your home in need of a refresh? Look no further than Lowe’s Repair Services. Whether it’s refreshing your interior with a fresh coat of paint, updating your kitchen with modern appliances, or revamping your outdoor space with landscaping, we have the expertise and resources to bring your vision to life. Say goodbye to dull and outdated and hello to vibrant and inviting.

Lowe’s: Your Partner in Home Repair Projects

Embarking on a home repair project can be overwhelming, but with Lowe’s by your side, you can tackle any challenge with confidence. Our team of experienced professionals is dedicated to delivering exceptional results that exceed your expectations. From initial consultation to project completion, we’re committed to providing personalized service and support every step of the way.

Discover Quality Solutions at Lowe’s Home Repair

Quality is at the heart of everything we do at Lowe’s. That’s why we partner with trusted brands and suppliers to bring you the highest quality products and materials for your home repair needs. Whether you’re replacing a broken window, repairing a damaged floor, or upgrading your plumbing fixtures, you can trust that Lowe’s has you covered with durable, long-lasting solutions.

Enhance Your Home’s Value with Lowe’s Repairs

Your home is one of your most valuable assets, and investing in repairs and improvements is key to maintaining its value over time. With Lowe’s Repairs, you can enhance the appeal and

Read More
Preventing and Repairing Bathroom Sink Leaks Below

Preventing and Repairing Bathroom Sink Leaks Below

Preventing and Repairing Bathroom Sink Leaks Below

Troubleshooting: Bathroom Sink Leaking Underneath

Identifying the Problem

You wake up one morning, head to the bathroom to start your day, only to find a puddle of water underneath your bathroom sink. Panic sets in as you realize you have a leak to deal with. But before you can fix it, you need to identify the source of the problem. Leaks underneath bathroom sinks can occur for various reasons, such as loose connections, damaged pipes, or worn-out seals.

Locating the Leak

The first step in fixing a bathroom sink leak underneath is to locate where exactly the leak is coming from. Check the pipes and connections under the sink for any visible signs of water dripping or pooling. Use a flashlight if necessary to get a better view. Pay close attention to the areas where the pipes connect to the sink and the wall, as these are common spots for leaks to occur.

Assessing the Damage

Once you’ve identified the source of the leak, assess the extent of the damage. Is it a minor drip, or is water gushing out rapidly? Is the leak confined to one area, or has it spread to other parts of the cabinet? Understanding the severity of the leak will help you determine the best course of action for repairs.

Gathering the Necessary Tools

Before you can start fixing the leak, make sure you have all the necessary tools and materials on hand. This may include a wrench, plumber’s tape, replacement pipes or connectors, and a bucket or towels to catch any excess water. Having everything you need ready will save you time and frustration during the repair process.

Turning Off the Water Supply

Before you can begin repairing the leak, you’ll need to shut off the water supply to the sink. Locate the shut-off valves underneath the sink or in the main water line and turn them clockwise to close them. Once the water supply is turned off, run the faucet to drain any remaining water from the pipes.

Tightening Connections

One of the most common causes of leaks underneath bathroom sinks is loose connections. Use a wrench to tighten any loose nuts or bolts connecting the pipes to the sink or the wall. Be careful not to overtighten, as this could cause damage to the pipes or fittings.

Replacing Damaged Parts

If tightening the connections doesn’t solve the problem, you may need to replace damaged parts such as cracked pipes or worn-out seals. Disconnect the affected pipes carefully, taking note of their position and orientation. Install the new parts, making sure to use plumber’s tape or sealant to prevent future leaks.

Testing the Repair

Once you’ve completed the repairs, it’s time to test whether the leak has been fixed. Turn the water supply back on and run the faucet to check for any signs of leaking. Inspect the connections and pipes closely for any drips or puddles. If everything looks dry, congratulations – you’ve successfully fixed the leak underneath your bathroom sink!

Preventing

Read More
Efficient Bathroom Sink Plumbing Solutions Unveiled

Efficient Bathroom Sink Plumbing Solutions Unveiled

Efficient Bathroom Sink Plumbing Solutions Unveiled

Mastering Bathroom Sink Plumbing: Essential Tips

Understanding the Basics

Bathroom sink plumbing might seem daunting, but it’s not as complicated as it appears. At its core, it involves a few key components: the sink, faucet, drain, and water supply lines. Understanding how these parts work together lays the foundation for successful plumbing maintenance and repairs.

Choosing the Right Materials

When it comes to bathroom sink plumbing, quality materials are crucial. Opt for durable pipes and fittings that can withstand constant use and exposure to water. Brass and copper are popular choices for their longevity and corrosion resistance. Investing in high-quality materials upfront can save you from costly repairs down the line.

Proper Installation Techniques

Proper installation is essential for ensuring the longevity and functionality of your bathroom sink plumbing. If you’re not confident in your DIY skills, it’s best to hire a professional plumber to handle the job. They have the expertise and tools to install the sink, faucet, and drain properly, preventing leaks and other issues.

Maintaining Your Plumbing System

Regular maintenance is key to keeping your bathroom sink plumbing in top condition. Inspect for leaks, corrosion, and mineral buildup on a regular basis. Clean the faucet aerator and drain stopper to prevent clogs and ensure smooth water flow. A proactive approach to maintenance can prolong the life of your plumbing system and save you from costly repairs.

Addressing Common Issues

Leaky faucets, slow drains, and low water pressure are common issues that plague bathroom sink plumbing. Fortunately, most of these problems can be easily resolved with a few simple steps. Tightening loose fittings, clearing clogs with a plunger or drain snake, and adjusting the water pressure valve are common DIY fixes.

Knowing When to Call a Professional

While DIY repairs can save you money, there are times when it’s best to call in a professional plumber. If you’re dealing with a major leak, sewer line issue, or complex installation, it’s wise to enlist the help of an expert. They have the training and experience to tackle even the toughest plumbing problems safely and effectively.

Upgrading Your Plumbing System

If your bathroom sink plumbing is outdated or inefficient, consider upgrading to modern fixtures and technologies. Low-flow faucets and toilets can help you conserve water and reduce your utility bills. Installing a water filtration system can improve the quality of your tap water, providing you with clean, fresh water for drinking and washing.

Staying Informed

The world of plumbing is constantly evolving, with new technologies and techniques emerging all the time. Stay informed about the latest trends and innovations in bathroom sink plumbing by reading industry publications, attending trade shows, and networking with fellow professionals. Continuous learning is key to staying ahead in this dynamic field.

Conclusion

Mastering bathroom sink plumbing is an achievable goal with the right knowledge and tools. By understanding the basics, choosing quality materials, and practicing proper maintenance techniques, you can keep your plumbing system running smoothly for years to come. And remember, when in doubt,

Read More
Elevate Your Space First Home Improvements Unleashed

Elevate Your Space First Home Improvements Unleashed

Elevate Your Space First Home Improvements Unleashed

Elevate Your Space: First Home Improvements Unleashed

Embark on Elegance
Embarking on the journey of home improvement is like stepping into a world of endless possibilities. It’s an opportunity to infuse your personal style, preferences, and creativity into every corner of your new abode. From selecting the perfect color palette to choosing the right furniture pieces, every decision you make contributes to crafting a space that truly reflects who you are.

Crafting Comfort
One of the primary objectives of first home improvements is to create a haven that exudes comfort and coziness. After all, your home should be a place where you can unwind, relax, and recharge after a long day. Whether it’s investing in plush sofas, layering soft rugs, or adding warm lighting fixtures, prioritizing comfort in your design choices is key to fostering a welcoming atmosphere.

Design Dreams Unfold
As you dive into the realm of home improvement, you’ll find yourself immersed in a world where design dreams unfold before your very eyes. From flipping through interior design magazines to scouring online inspiration boards, there’s no shortage of ideas to fuel your imagination. Whether your style leans towards minimalist chic or bohemian flair, embracing your design aesthetic is all part of the adventure.

Making Memories
Beyond mere aesthetics, first home improvements are also about creating spaces that facilitate meaningful experiences and cherished memories. Whether it’s hosting intimate dinner parties with friends, cozy movie nights with loved ones, or simply enjoying quiet moments of solitude, your home becomes the backdrop for life’s most precious moments. Each design decision you make contributes to shaping these experiences, making them all the more special.

Blueprinting Bliss
Every successful home improvement project begins with a solid plan. Before diving headfirst into renovations, take the time to blueprint your vision for your space. Consider factors such as layout, functionality, and flow to ensure that your design aligns with your lifestyle needs. Whether you’re knocking down walls to create an open-concept living area or maximizing storage space in a compact kitchen, a well-thought-out plan sets the stage for blissful living.

Crafting Your Oasis
Your home should be more than just a place to reside; it should be your sanctuary, your oasis amidst the chaos of the outside world. Whether it’s carving out a cozy reading nook by the window, transforming your bathroom into a spa-like retreat, or cultivating a lush indoor garden, prioritize elements that promote relaxation and rejuvenation. After all, there’s nothing quite like coming home to a space that feels like a sanctuary from the hustle and bustle of everyday life.

From Vision to Reality
As you embark on your journey of first home improvements, remember that patience and perseverance are key. Transforming your vision into reality takes time, effort, and sometimes a few unexpected setbacks along the way. But with each coat of paint applied, each piece of furniture assembled, and each decorative accent curated, you’re one step closer to realizing the home of your dreams. So don’t be afraid to roll

Read More